Download: MyIIS7Project.zip
This article, the first in the IIS7 .NET Developer series, focuses on getting started with developing IIS7 web server features based on the .NET Framework. This article will demonstrate:
1. How to decide whether to develop an IIS7 module or an IIS7 handler.
2. How to set up your development environment, with Visual Studio, Visual C# Express, or command-line tools provided with the .NET Framework.
3. How to create your first project
4. How to develop a simple module and handler
5. How to deploy a simple module and handler to an IIS7 server
If you’d rather see some real-world managed IIS7 modules and handlers, and download them for your application, you can visit Redirect requests to your application with the HttpRedirection module, Get nice looking directory listings for your IIS website with DirectoryListingModule, Display pretty file icons in your ASP.NET applications with IconHandler, and Stopping hot-linking with IIS and ASP.NET.
You can also download the source code project for the module and handler described in this article.
Update: We recently launched a service that significantly helps you understand, troubleshoot, and improve IIS and ASP.NET web applications. If you regularly troubleshoot IIS errors, manage Windows Servers, or tune ASP.NET performance, definitely check out the demo at www.leansentry.com.
Introduction: Developing IIS7 features with ASP.NET
IIS releases prior to IIS7 featured a C API, called ISAPI, as a primary extensibility API for building web server features. IIS7 has been re-engineered from the group up to provide a brand new C++ API, on which all of the in-the-box features are based, to allow complete runtime extensibility of the web server.
In addition to this, IIS7 for the first time also provides a full-fidelity .NET API for extending the web server, by leveraging tight integration with ASP.NET 2.0. To you, this means that you are now able to extend IIS7 with new web server features built with the familiar ASP.NET 2.0 APIs. Likewise, you can use existing ASP.NET 2.0 modules and handlers on IIS7, leveraging ASP.NET integration to enhance the power of your application without writing any new code. To learn more about ASP.NET integration in IIS7, please visit http://www.iis.net/articles/view.aspx/IIS7/Hosting-Web-Applications/ASP-NET/ASP-NET-Integration-with-IIS7.
Tools of the trade: deciding on your development environment
To build IIS7 modules and handlers, you can use any environment that allows you to develop and compile .NET assemblies. Some of the common options are:
1. Visual Studio 2005. Alternatively, you can also download the latest beta release of Visual Studio 2008.
2. Visual C# 2005 Express Edition, a free download (or other Express tools, including Visual Basic 2005 Express).
3. The C# command line compiler (csc.exe) included in the .NET framework runtime (for other languages, you will need to download the SDK), plus your favorite source editor.
The samples in this article use C#, although you can develop IIS7 components in any other supported .NET language (except managed C++). The article illustrates how to develop IIS7 extensibility components with all 3 of the above environments.
A note: because IIS7 leverages the existing ASP.NET APIs for its .NET extensibility, you can develop IIS7 .NET modules and handlers with .NET Framework 2.0 on Windows XP and Windows Server 2003. However, if you plan to use one of the several new ASP.NET APIs that have been added to support new IIS7 features, you will need to either develop on Windows Vista, or obtain the version of System.Web.dll from in Windows Vista or the latest release of .Net Framework 3.5 in order to compile your code. More on this further in the article.
Two ways to extend IIS7: module vs. handler
All IIS7 web server features fit into two categories: modules, and handlers.
A module, similar to the ISAPI filter in previous IIS versions, participates in the request processing of every request in order to change or add to it in some way. Examples of some in-the-box modules in IIS7 include authentication modules, which manipulate the authentication status of the request, compression modules that compress the outgoing response, and logging modules that log information about the request to the request logs.
The module is a .NET class that implements the ASP.NET System.Web.IHttpModule interface, and uses the APIs in the System.Web namespace to participate in one or more of ASP.NET’s request processing stages.
A handler, similar to the ISAPI extension in previous IIS versions, is responsible for handling the request and producing the response for specific content types. The main difference between the module and the handler is that the handler is typically mapped to a particular request path or extension, and supports the processing of a specific server resource to which that path or extension corresponds. Examples of handlers provided with IIS7 include ASP, which processes ASP scripts, the static file handler, which serves static files, and ASP.NET’s PageHandler which processes ASPX pages.
The handler is a .NET class that implements the ASP.NET System.Web.IHttpHandler or System.Web.IAsyncHttpHandler interface, and uses the APIs in the System.Web namespace to produce an http response for specific content it supports.
When planning to develop an IIS7 feature, the first question you should ask is whether this feature is responsible for serving requests to a specific url/extension, or applies to all/some requests based on arbitrary rules. In the former case, your should be a handler, and in the latter, a module.
This article demonstrates building both a simple module, and a simple handler, the common steps in creating the project, and compiling it, and the specific steps to deploying them to the server. Please note that you are not required to develop a handler if you are developing a module, and visa-versa.
Getting started: Creating the Visual Studio project
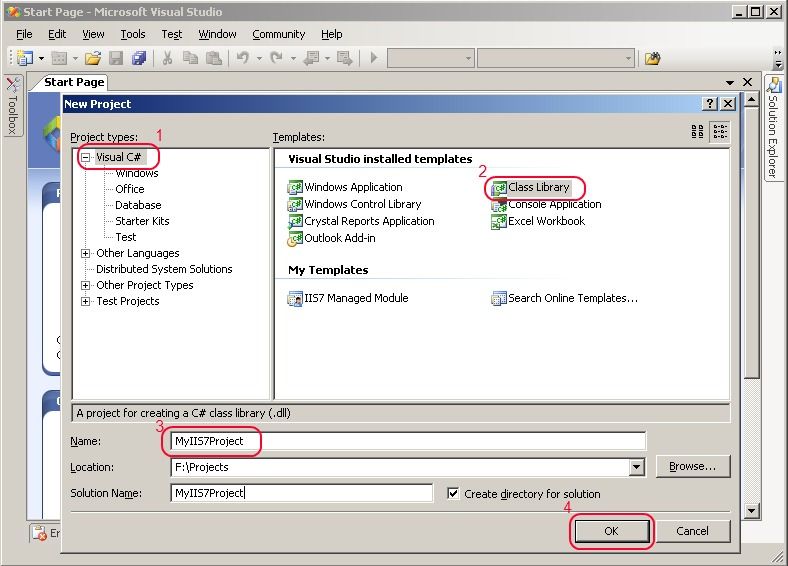
To build either a module or a handler, you will need to produce a .NET assembly (DLL) containing the module/handler classes. If you are using Visual Studio or Visual Studio Express tools, the first step is creating a Class Library project (if you are using your own text editor and the command line compiler, please skip to compiling the project)for instructions on how to compile the project without Visual Studio):
1) From the “File” menu, select “New”, “Project …”. In the New Project dialog (below), select the “Visual C#” project type and select the “Class Library” in the right hand list of Visual Studio installed templates.
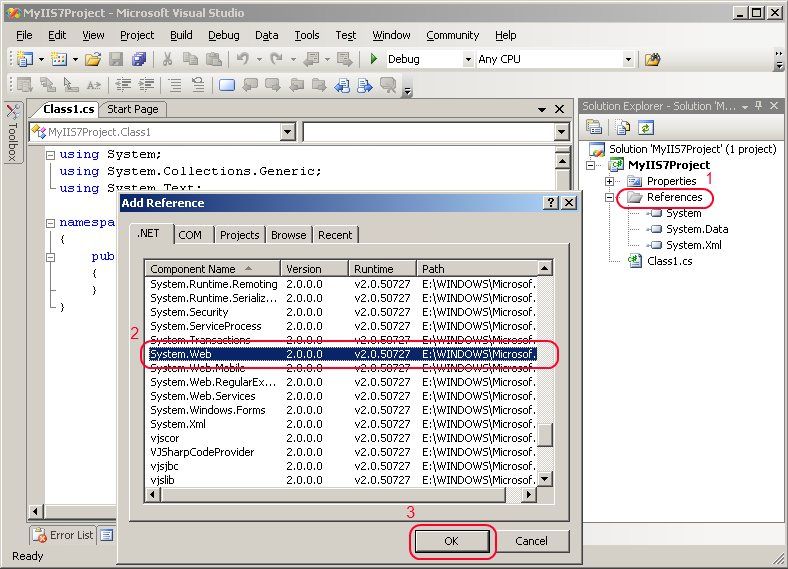
2) Now, we need to add a reference to the “System.Web.dll” assembly which contains the APIs used to develop ASP.NET and IIS7 modules and handlers. Right click on the “References” node under the Project node in the right hand solution explorer treeview, choose “Add Reference …”, and in the .NET tab select the System.Web assembly, version 2.0 (below).
Note: You can use the System.Web assembly version 2.0 on Windows XP and Windows Server 2003 if you do not plan to take advantage of IIS7 specific ASP.NET APIs. Modules and handlers compiled referencing this assembly can be deployed and operated on IIS7 on Windows Vista and Windows Server 2008 without a problem. If you do want to use the few IIS7 specific ASP.NET APIs in your module, you will either need to develop on Windows Vista, Windows Server 2008, or obtain the System.Web.dll assembly from .NET Framework 3.5. The IIS7 specific APIs include HttpServerUtility.TransferRequest, the HttpResponse.Headers collection, the HttpApplication.LogRequest event, and several others.
Let’s write some code: Building a simple module
Let’s go ahead and build a simple module. Later in the article, we will also build a sample handler – jump ahead if you want to read about building a handler instead.
To create a module, we need to define a class that implements the System.Web.IHttpModule interface. Let’s do that:
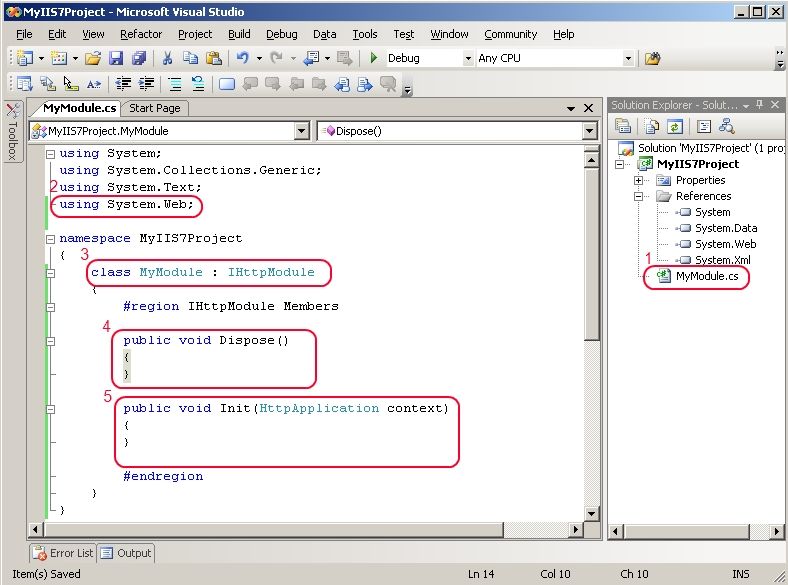
1) First, delete the “class1.cs” file generated by the project system, and add a new C# class called MyModule by right-clicking on the MyIIS7Project project in the right-hand tree view, selecting “Add”, New item …”, choosing “Class”, and typing in “MyModule.cs” in the Name field.
2) Import the System.Web namespace so we can easily access the types therein.
3) Make our MyModule class implement the IHttpModule interface, and define the interface members Dispose() and Init(). You can do this quickly by right clicking IHttpModule interface and choosing “Implement interface” option:
The Dispose() method is intended to clean up any unmanaged resources deterministically when the module is being unloaded, so the resources can be released before the module instance is finalized by the garbage collector. You may leave this method blank most of the time.
The Init(HttpApplication context) method is the main method of interest. Its role is to perform the initialization of your module, and wire up your module to one or more of request processing events available on the HttpApplication class. During the request processing, your module will be invoked for each of the events that it subscribed for, allowing it to execute and perform its service. Let’s do that:
4) Subscribe to one or more of the request processing events by wiring up a method on your module class to one of the events on the HttpApplication instance provided. The method has to follow the System.EventHandler delegate signature. Let’s define a new method, called OnPreExecuteRequestHandler, and wire it up to the HttpApplication.PreRequestRequestHandlerExecute event, which occurs right before the server is about to invoke the request handler for the request:
public void Init(HttpApplication context)
{
context.PreRequestHandlerExecute +=
new EventHandler(OnPreRequestHandlerExecute);
}
At this point, our module is set up to receive the PreRequestHandlerExecute event on each request. You can repeat this for all other events you would like to receive – you can find the complete list of IIS7 pipeline events here.
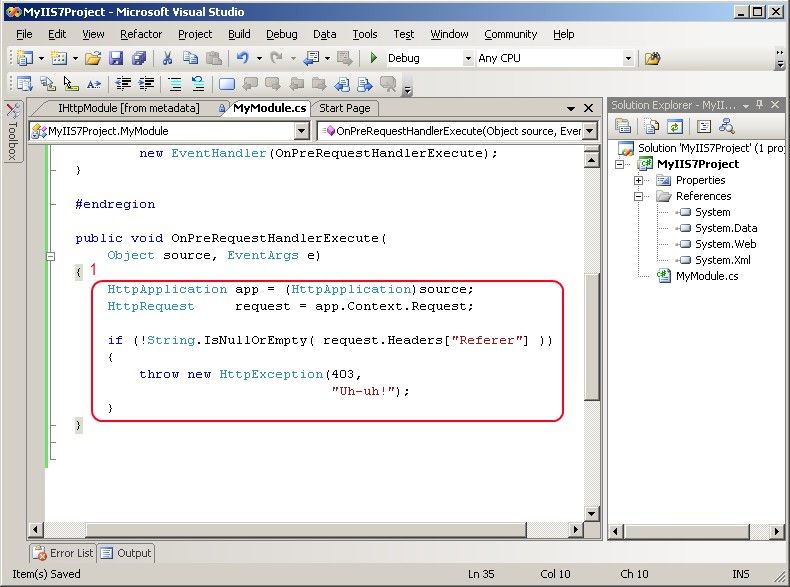
5) Now, Finally, let’s make our modules do something useful. Well, maybe not useful, but something that illustrates using some of the ASP.NET APIs that a module could use – let’s check if the request specifies a referer header, and if it does, reject it, as silly way to prevent people from linking to your website from other websites. We will do this in our OnPreRequestHandlerExecute method which will be invoked right before the handler runs on every request:
public void OnPreRequestHandlerExecute(
Object source, EventArgs e)
{
HttpApplication app = (HttpApplication)source;
HttpRequest request = app.Context.Request;
if (!String.IsNullOrEmpty( request.Headers[“Referer”] ))
{
throw new HttpException(403,
“Uh-uh!”);
}
}
Note that the HttpApplication instance is provided to your module via the source argument, and requires casting. You can access the rest of the request object model from the HttpApplication instance, such as the HttpContext object, and the contained HttpRequest object that represents the request.
The code above checks if the Referer header has been specified, and if so, it rejects the request with a 403 Unauthorized error code.
Let’s write some code: Building a simple handler
Now, let’s go ahead and build a simple handler. Earlier in the article, we built a sample module – jump back if you want to read about building a module instead.
To create a handler, we need to define a class that implements the System.Web.IHttpHandler interface (we can also implement the System.Web.IHttpAsyncHandlerif we want the page to execute asynchronously). Let’s do that:
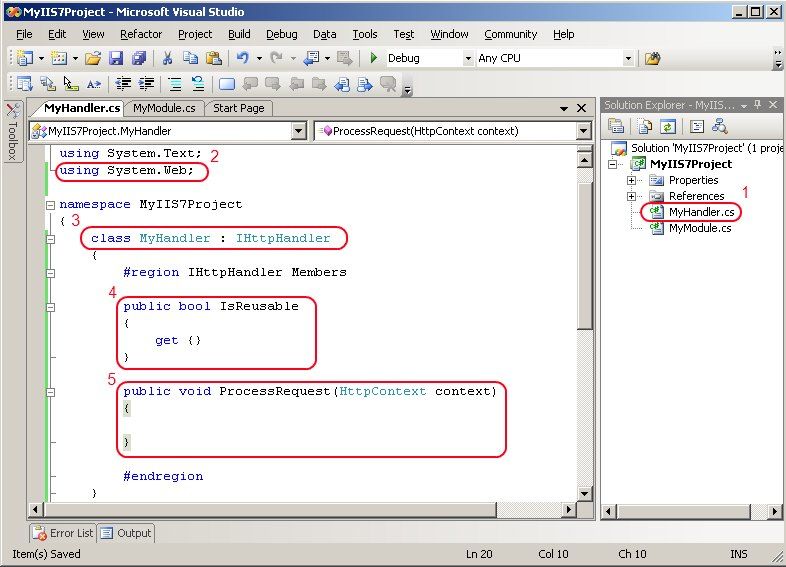
1) If you haven’t already, delete the “class1.cs” file generated by the project system, and add a new C# class called MyHandler by right-clicking on the MyIIS7Project project in the right-hand tree view, selecting “Add”, New item …”, choosing “Class”, and typing in “MyHandler.cs” in the Name field.
2) Import the System.Web namespace so we can easily access the types therein.
3) Make our MyHandler class implement the IHttpHandler interface, and define the interface members IsReusable and ProcessRequest(). You can do this quickly by right clicking IHttpHandler interface and choosing “Implement interface” option:
The IsReusable() indicates whether or not your handler instance can be re-used for subsequent requests. In some cases, after processing the request your handler may be in an incorrect state to process another request, especially if you have stored data about the previous request in member variables. Note that the runtime will never use the same instance of your handler to process two requests at the same time, even if its marked as reusable. If your handler does not store any per-request state in member variables and can have its ProcessRequest function called as many times as needed, make this property return true to allow reuse.
The ProcessRequest () method is the main entrypoint of the handler. It’s role is to process the request specified by the HttpRequest instance available off the provided HttpContext instance, and generate the appropriate response using the HttpResponse instance also available off the HttpContext. The ProcessRequest() method will be invoked by the runtime during the ExecuteRequestHandler request processing stage, and ONLY IF the request mapped to your handler based on the configured handler mappings. This is different from a module which receives notifications for all requests to the application.
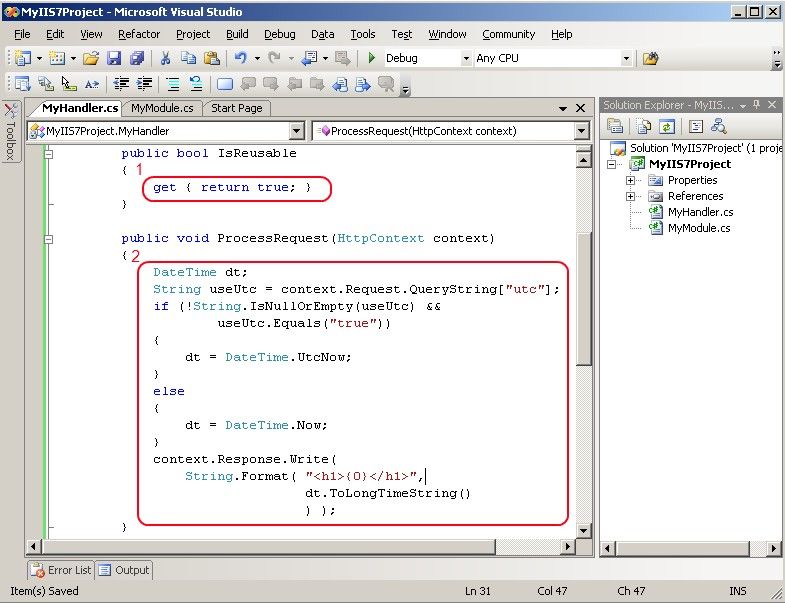
4) Let’s implement the IsReusable property first. Since our handler wont store any member state for the request and will be able to support multiple calls to ProcessRequest() with different requests, we will mark it as reusable by returning true.
public bool IsReusable
{
get { return true; }
}
5) Finally, let’s implement the ProcessRequest() method to make our handler actually do something useful. To keep things nice and simple, our handler will return the current time on the server, optionally allowing the timezone to be specified in the querystring. Our goal is to be able to request a url, like http://myserver/time.tm, and get the current time on the server. Also, we will be able to the universal coordinated time by requesting http://myserver/time.tm?utc=true. Here is our implementation:
public void ProcessRequest(HttpContext context)
{
DateTime dt;
String useUtc = context.Request.QueryString[“utc”];
if (!String.IsNullOrEmpty(useUtc) &&
useUtc.Equals(“true”))
{
dt = DateTime.UtcNow;
}
else
{
dt = DateTime.Now;
}
context.Response.Write(
String.Format( “<h1>{0}</h1>”,
dt.ToLongTimeString()
) );
}
We use the HttpRequest.QueryString collection to retrieve a querystring variable, and write the current time to response using the HttpResponse.Write method. This is just a sample of the kinds of things you may choose to do in your handler – the HttpRequest class provides a lot more information about the request, and the HttpResponse class provides a number of different ways to shape the response returned to the client.
That’s it – our handler is finished.
Code complete: Compiling the module/handler
Now that we have the module and handler implemented, we can compile them into an assembly that ASP.NET can load at runtime. If you are using Visual Studio or Visual Studio Express, you can compile the project directly from the tool by pressing “Ctrl-Shift-B” or right-clicking on the project and choosing “Build”.
The .DLL assembly will be generated in the <ProjectDirectory>bindebug folder, along with the .PDB symbols file that you can use for debugging the assembly on the server / including source code lines in exceptions during the debugging stage of your project.
If you are uploading your assembly to a production server, be sure to change the Solution configuration to be “Release” by right clicking the solution node, choosing Configuration Manager, and changing the type to Debug. Upload the Release version of the assembly (leave the PDB file behind) – this will strip the debugging information from the assembly, and optimize it resulting in faster code.
If you are not using Visual Studio, you can compile the project with the C# command line compiler included in the Framework runtime. To compile your project, open a command line prompt (be sure to run the command line prompt with the “Run as Administrator” option if you are on Windows Vista or Windows Server 2008):
> %windir%Microsoft.NETFrameworkv2.0.50727csc.exe /t:library /out:MyIIS7Project.dll /debug *.cs /r:System.Web.dll
This will produce the MyIIS7Project.DLL and MyIIS7Project.PDB files. If you want to build a release version of the assembly, omit the /debug switch, and include the /o switch to optimize the assembly.
Go time: Deploying the assembly to the server
Now that we have implemented the custom module and handler, it’s time to deploy them to your web application. There are a number of ways to deploy a module or handler to your application, and a number of configuration options you can use to tailor their deployment to your needs. We will illustrate the most basic deployment steps below. For an advanced discussion of deployment and configuration options, including how to deploy a module/handler for the entire server, please see the next article in the series: Deploying IIS7 modules and handlers (coming soon).
The steps below assume that you are deploying the module and handler to an existing application on your IIS7 server. If you don’t have an application created, you can just use the root application of the “Default Web Site” typically located at %systemdrive%inetpubwwwroot. In the example below, I will deploy the module and handler to an application called “myiis7project” located in the Default Web Site.
To deploy the module and handler, we will first need to make the assembly containing their implementation available to your ASP.NET application:
1) Copy the MyIIS7Project.dll assembly that we compiled earlier to the /BIN directory located in the root of your application. If this directory doesn’t exist, you need to create it.
Now, let’s configure the module and handler to be loaded in the application:
2) Open the IIS7 Administration tool via the Start menu, typing in inetmgr.exe in the start/search box and pressing Enter. In the tool, double-click on your server node in the left-hand treeview, then expand the “Sites” node, and double-click on the site or application to which you would like to add your module and handler.
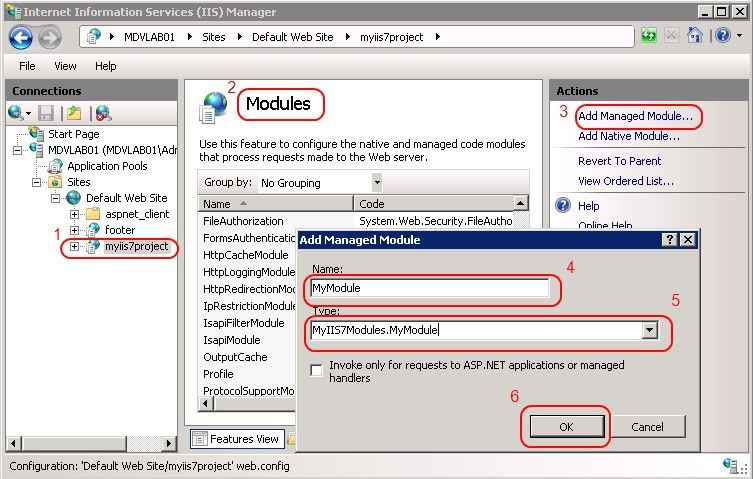
3) Select the “Modules” feature icon, then click the “Add Managed Module …” action, and in the resulting dialog box type in the module name (arbitrary) and the fully-qualified module type “MyIIS7Modules.MyModule”. Note that you can also select the type in the dropdown box, as the tool will automatically load your assembly in bin and discover types that implement the IHttpModule interface. Press OK to add the module.
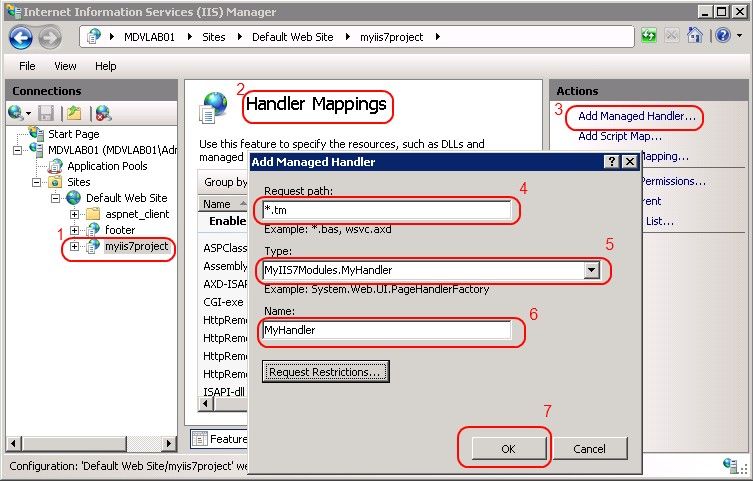
5) Now, add the handler by double-clicking the site/application node again, and selecting the “Handler Mappings” feature icon. Then, click the “Add Managed Handler …” action, and in the resulting dialog box specify “time.tm” for path, “MyIIS7Modules.MyHandler” for the type, and “MyHandler” for the name (arbitrary). Again, note that the type is present in the dropdown box because the Admin tool automatically detected this type in your assembly. Press OK to add the handler.
The application configuration generated by the actions above configures the MyModule module to be loaded in your application (which enables it to run for all requests), and maps the MyHandler handler to process requests to the time.tm url inside your application.
Note that this configuration enables your module and application to run only in IIS7 Integrated mode applications. If you would like the module and handler to also run in Classic mode applications on IIS7, and also on earlier versions of IIS, you will need to also add the Classic ASP.NET configuration for the module and handler. In addition, when running in Classic mode on IIS7 or on earlier versions of IIS, your handler will require you to create a scriptmap mapping the .tm extension to ASP.NET in IIS scriptmaps, and your module will run only for requests to extensions mapped to ASP.NET. For more details on this, please see Deploying IIS7 modules and handlers (coming soon).
You can also add the module and the handler using the IIS7 command line tool, AppCmd.exe, or by manipulating the IIS7 configuration from script or managed code, or by placing the configuration directly into the web.config file. These additional options are discussed in-depth in Deploying IIS7 modules and handlers (coming soon).
Let’s see it in action: testing the module and handler
Now that we have deployed and configured the module / handler, let’s quickly can test them:
1) First, let’s test our handler by making a request to “time.tm” in our application. If successful, we should see the current time on the server. Make a request to your application, for example http://localhost/myiis7project/time.tm as I deployed the handler to the myiis7project application in the Default Web Site:
If the handler is properly deployed to this application, you should see the current time on the server:
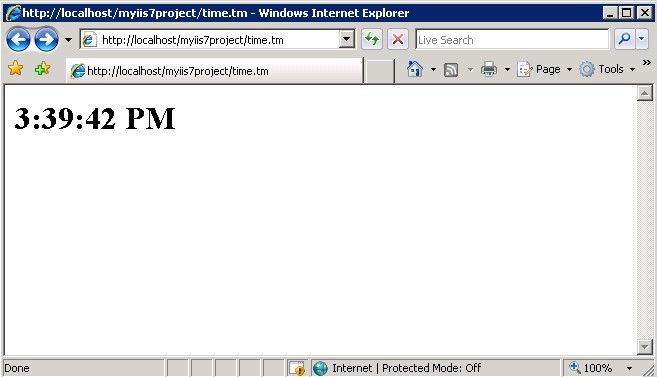
You can also try requesting http://localhost/myiis7project/time.tm?utc=true to display the time in UTC.
2) Now, let’s test our module. To do that, lets first create a simple html page called page.html in your application that links to the /time.tm url:
page.html
<html>
<body>
<a href=”time.tm”>View current server time</a>
</body>
</html>
Then, make a request to http://localhost/myiis7project/page.html to display the link. When you click on the link, you should observe an error:
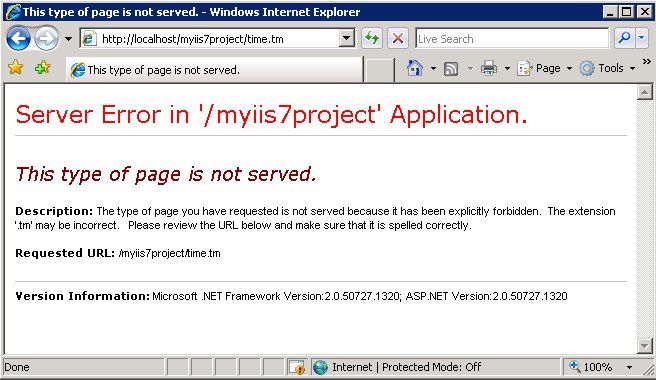
But wait, didn’t we just request this same url above and successfully see the time? This is because our module is configured to reject requests to your application that specify a Referer header, which gets added by the browser whenever a user clicks a link to go to your website instead of just typing in the url in the browser directly. So, when you requested the url directly, you were able to access it just fine – however, when you followed a link from another page, your request was rejected by our module.
Summary: Where do we go from here?
In this article, we illustrated the basic steps for developing an IIS7 module and handler with the familiar ASP.NET APIs, and deploying them to your application. We also discussed the choices you have for your development environment, and how to decide when to build a module vs. a handler. The information in this article should enable you to build your first modules and handlers to empower your IIS7 applications.
You can also download the source code project for the module and handler described in this article.
Be sure to check out more examples of how managed IIS7 modules and handlers can add value to your applications, and download them for your application by visiting Redirect requests to your application with the HttpRedirection module, Get nice looking directory listings for your IIS website with DirectoryListingModule, Display pretty file icons in your ASP.NET applications with IconHandler, and Stopping hot-linking with IIS and ASP.NET.
In the next few upcoming articles in this series, we will drill into a number of advanced topics around development of IIS7 web server features. These will include advanced development topics, deployment and configuration options, and strategies for debugging your modules and handlers.
For now, you can review an example module that enables basic authentication against ASP.NET’s Membership providers in Developing a Module using .NET. Feel free to also check out the rest of my blog, https://mvolo.com, for frequent posts with samples, tools, and information related to developing for IIS7.

PingBack from http://blogs.msdn.com/mvolo/archive/2007/08/16/developing-iis7-web-server-features-with-the-net-framework.aspx
This article, the first in the IIS7 .NET Developer series, focuses on getting started with developing
This article, the first in the IIS7 .NET Developer series, focuses on getting started with developing
Don’t you just love IIS?
I missed the possibility of writing IIS modules in managed code for a long time.
There is also some kind of video from MIX where you can see even more of IIS exetensibility.
You can even extend the IIS Manager!
(no idea who made that movie though)
Link: http://mvolo.com/blogs/serverside/archive/2007/08/15/Developing-IIS7-web-server-features-with-the-.NET-framework.asp
Mike Volodarsky, the Program Manager of IIS team at Microsoft, has written a very good blog post about
Sviluppare moduli e handler per IIS7 con .Net
I have visited your site 215-times
Here is the latest in my link-listing series . Also check out my ASP.NET Tips, Tricks and Tutorials page
Here is the latest in my link-listing series . Also check out my ASP.NET Tips, Tricks and Tutorials page
Here is the latest in my link-listing series . Also check out my ASP.NET Tips, Tricks and Tutorials page
Here is the latest in my link-listing series . Also check out my ASP.NET Tips, Tricks and Tutorials page
Here is the latest in my link-listing series . Also check out my ASP.NET Tips, Tricks and Tutorials page
Link: http://mvolo.com/blogs/serverside/archive/2007/08/15/Developing-IIS7-web-server-features-with-the-.NET-framework.aspx
This month, the Enhance Your Apps With the Integrated ASP.NET Pipeline article is finally out in MSDN
At last, my MSDN article about using the ASP.NET Integrated Pipeline is out in MSDN Magazine. This article
At last, my MSDN article about using the ASP.NET Integrated Pipeline is out in MSDN Magazine. This article
Compiling a C++ source file with /clr:safe generates code equivalent to what would csc have generated without /unsafe. I see no reason why C++ cannot be used to develop IIS components in managed code.
Lynn’s slides – Jan 2008 Allup » SlideShare Original slides and session recordings – http://www.msdnevents.com/resources/2008-winter-resources.aspx
Lynn's slides – Jan 2008 Allup » SlideShare Original slides and session recordings – http://www.msdnevents
MSDN Events is back! It’s a new year and this week I’m back on the road delivering MSDN events again.
Technorati Tags: MSDN MSDN Events is back! It's a new year and this week I'm back on the road
August 30th Links: ASP.NET, ASP.NET AJAX, IIS7, Visual Studio, Silverlight, .NET
Mike,
Does IIS 7.0 have a specialized config section for executionTimeOut? Or does it simply use the setting in the section of ASP.NET 20 web.config?
Shiv
Hi Shiv,
IIS 7.0 does not have its own concept of an execution timeout (since we cannot abort native threads executing arbitrary code), but individual application frameworks do provide their own limits. ASP.NET still uses the httpRuntime timeout you mentioned, ASP has its own, and so does FastCGI (the latter two only consider the handler execution time – i.e. the ASP script or PHP script when PHP is hosted via FastCGI).
Thanks,
Mike
In the past, I've blogged a number of times about using Visual Studio to develop and debug IIS 7.0
Para empezar a probar IIS 7 sobre Windows Server 2008, podemos descargar Windows Web Server 2008 , lo
The IIS 7.0 Resource Kit Book is finally out! Ok, it’s been out for almost 2 months, but somehow
Visual Studio 2008 SP1 Beta is now available! You can download it here . In SP1, we have added some new
Para empezar a probar IIS 7 sobre Windows Server 2008, podemos descargar Windows Web Server 2008 , lo
You rock man! This is exactly what I was looking for. It would be good to know how to do the same without any C++/C magic. Thanks!
Para empezar a probar IIS 7 sobre Windows Server 2008, podemos descargar Windows Web Server 2008 , It would be good to know how to do the same without any C++/C magic. Thanks .
http://www.cyberdesignz.com/
Hi, thanks for that great example but I can’t make it work.
When ever I try to add the module I get the information that the assembly MyModule is missting in the web.config compilation section.
Maybe somebody can help me?
Thanks, Andre
This morning we delivered the 15th webcast in the BenkoTips Live & On Demand series . We talked about
Hi Vilas,
Please post beginner questions to forums.iis.net in the future. You’ll have to provide a little bit more details on your app when you do this.
By default dir listings are not protected with asp.net authentication/authorization features. If you were using IIS6 wildcard mapping for this purpose, you’ll need to run in IIS7 integrated mode (default) and configure your ASP.NET modules to run for all requests. You can find an example of that here: http://learn.iis.net/page.aspx/244/how-to-take-advantage-of-the-iis7-integrated-pipeline/.
You may have similar issues with other ASP.NET modules you may want to use for all requests. The simplest way to make all asp.net modules run for all requests in the IIS7 integrated pipeline is to add:
This is also the only way to enable code in global.asax to run for all requests.
Thanks,
Mike
Hi Mike,
I have a problem that I thought a module will help me but it didn’t do the job.
I have an application with a slow load.
I want the server to be loaded before the first request hits. So the response time of the first one won’t be long and won’t cause a queue.
So lets say I work with the recycling mode. I get to the point where an overlapped recycle happens. The second worker process goes up but my application is not loaded to the server till the first request gets there and then has to wait for the server to load. Instead of having the server loaded and no requests waiting.
Is there a way to do that?
Thanks,
Oshrat.
Thanks,
Oshrat.
Hey Guys..
Earlier, I was working on a IIS 6 default website where the ISAPI application extension mapping was done & .html and .htm pages were working with ‘aspnet_isapi.dll’ file. However, in IIS7.0 i am not able to do and i never find the check box which says “Verify that File Exists” or not. I used to select ‘All Verbs’ and used to Uncheck “Verify that File Exists” check box in the Application Extension Mapping, Now in Vista n IIS 7.0 has same option but i am not able to open login.html and my application gives error.. all HTML pages are not a physical pages but coming through that aspnet_isapi.dll. Please help me in this…
wow exactly what i was looking for.
>> “…please see the next article in the series: Deploying IIS7 modules and handlers (coming soon).”
Define “soon” :).
Why does the code-genned comment from VS2008 HttpHandler template direct me to http://go.microsoft.com/?linkid=8101007, which then redirects here?
As I am not using IIS7, I’m not sure this makes any sense.
Hmmm, could not get my handlers to appear in IIS7 within the Type drop down unless the classes inheriting the http interfaces were public…..
But that is not done in the example above?
Hi Mike I m facing prob while accessing http://host:port/ for IIS 7 and 7.5 if impersonation is enable.
error comes:
500 – Internal server error. There is a problem with the resource you are looking for, and it cannot be displayed.
could u please provide me hint to work it.
thanks
Register httphandlers using the web.config
http://msdn.microsoft.com/en-us/library/46c5ddfy.aspx
Thanks for sharing your info. I really appreciate your efforts and I will be waiting for your further write ups thanks once again.
IIS7 for the first time also provides a full-fidelity .NET API for extending the web server.
I did it, but I got a error message: failed to load assembly mymodule,
then I changed the name of mymodule.dll , which was deployed under the bin directory, to MyIIS7Project.dll, and finally I secceed to visit http://localhost/myiis7project/time.tm
could you please tell me more about this ?
thanks
if i want to redirect to the same web application but different site collection it is going infinte loop